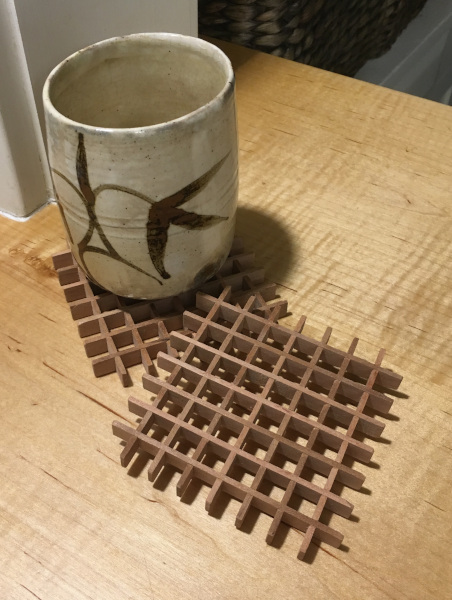
Kumiko Coasters
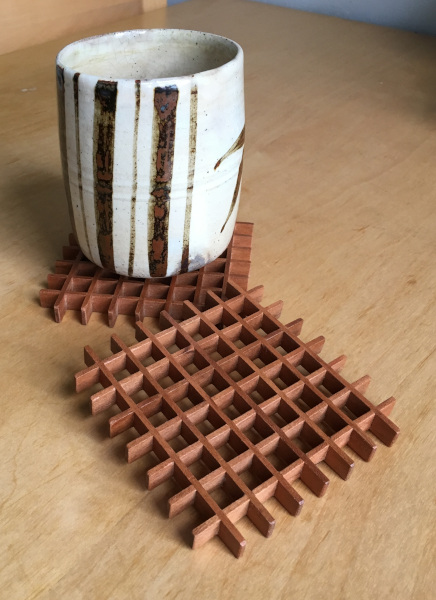
After creating the kumiko panels for my current end table project, I had an opportunity to give kumiko a try again: I made a pair of coasters as a gift. They are about 3-7/8″ square, and I designed the square grid pattern of 1:4 ratio (stock thickness to the opening). I also made the thickness of the coasters to match the spacing, so that each cavity forms a cube. The material is cherry and finished with clear lacquer.
The key, which made this build much simpler than the kumiko panels for the table, is that I made the thickness of the stock to be a single-kerf width of my table saw blade. I use a thin-kerf blade, so it is just about 3/32″ thick. This made cutting of the egg-crate joints much simpler and error proof.
Build Process
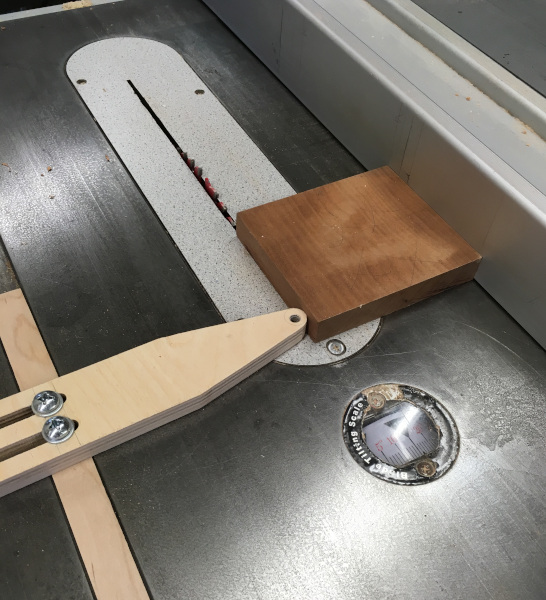
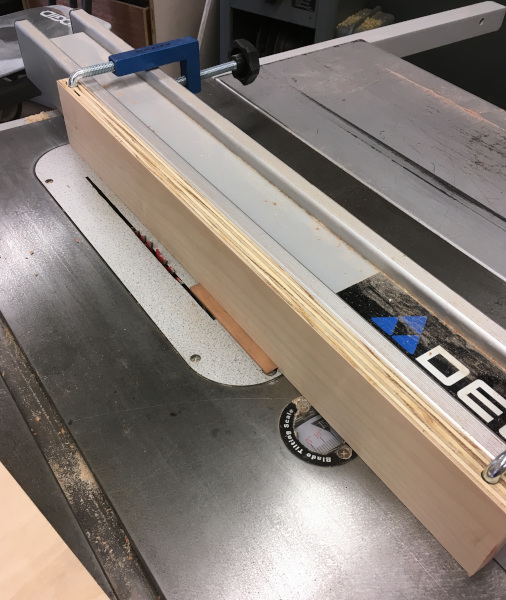
For this project, I used small offcut boards of cherry that I kept around in the shop. They were all 3/4″ thick, well thicker than the target width of the kumiko stock. So, I could thin-rip the boards for efficient use of the material. To do so I used my shop-made thin-rip table saw jig. After many thin strips are cut to their near-final thickness (~1/8″, 1/32″ thicker than the final thickness of 3/32″), each strip was ripped to the final width. Here, I had to attach an auxiliary fence to the rip fence to make sure the stock won’t slide under the fence.

First, rip to rough thickness 
Then, rip to width
After milling of 4 sides, I shot one end square with a shooting board and cut kumiko stock into rough length (not pictured).
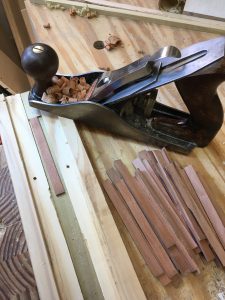
Then, I used my #3 bench plane and a thicknessing jig to mill the kumiko stock to its final thickness. The thicknessing jig has a track, on which you run a bench (or block) plane. After a first couple strokes (jig alone), the plane stops cutting the jig as its edges ride on the track. The kumiko stock sits in the narrow groove in the middle of the jig. The jig was prepared with the router plane so that the depths of the grooves yield the exact stock thickness.
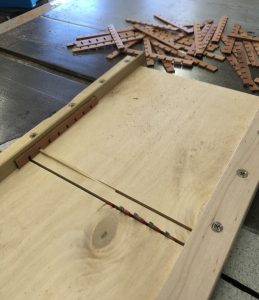
With the stock milled to proper size, I cut the egg-crate joints using a custom sled on the table saw. This sled resembles that for box joints, such that it has a key “tooth” so the joints are cut equally spaced apart. The key is precisely place by fitting it in a kerf-width dado, which is 4 kerf-width away from the cutting edge of the sled. A short piece of kumiko stock is then fitted to the kerf, acting as the key.
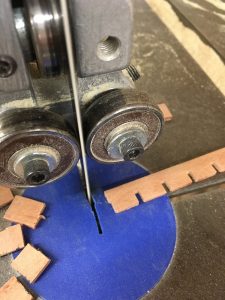
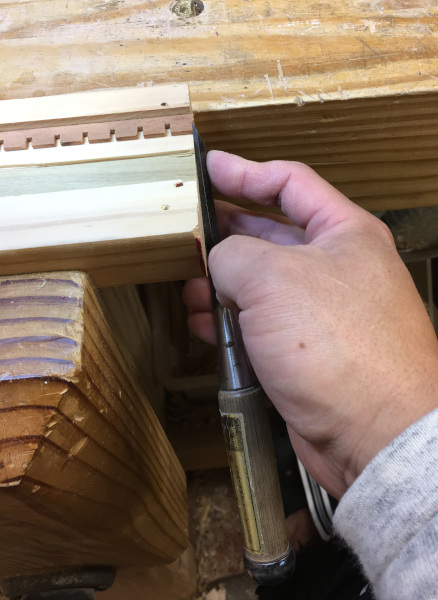
I cut one extra notch (8) than needed to get the exact “overhang” on the both ends of a kumiko member. To get the final thickness, I crosscut (at the bandsaw) right at the 8th notch, then cleaned up with chisel. Here, I used the end of my thicknessing jig to pare the end square.
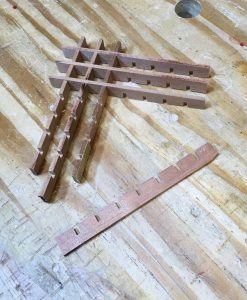
This completes the prepping of kumiko members (14 total per coaster), and they are ready to be assembled. Because stock thickness exactly matches the width of saw kerf, the joints should come together perfectly. I dry-fitted first, picking the best looking pieces, then glued them all up. It is super-important here to use minimal amount of glue to avoid any squeeze-out. This I didn’t follow, and cleaning up the squeeze-out tested my patience to the nth degree. No clamping is necessary but make sure all joints are fully closed, and top and bottom surfaces are flat.
After glue is dried, sand the top and bottom surfaces by hand. A random orbital sander would likely destroy it in no time. To sand along the grain, wrap a sand paper on a thin piece of wood and run it first in the direction of notched kumiko members then turn it 90° and sand the full-bodied cross-members. This order minimizes cross-grain scratch pattern. Once sanding is done, they are ready for finish.
Tips:
Here are somethings that I learned:
- Wood selection. Japanese traditionally uses straight-grained cedar and cypress for kumiko. Choosing appropriate wood species and straight-grain stock is vital for ease of production. You are depending on a hand plane to create finish ready vertical faces, so pick the material most friendly to hand planes. For the most part, its beauty comes from the structure and not wood itself. Figures may not even be noticed on the finished piece. Note: You could do the thicknessing with a drum sander to avoid grain issues altogether.
- Sharp Blade. Yes, that’s an obvious one but it is very important. You want the table saw to cut as cleanly as possible. We are cutting bazzilion closely spaced crosscuts, and tearouts could easily ruin your parts or leaves you with painful cleanup step.
- Finishing. I noted that spray finish can reach all the nooks and crannies. I don’t see any other type to work unless you use artists’ detail paintbrush and a lot of patience. I think prefinishing could be a good solution but masking glue surface may become too much.
- Endgrain Brittleness. The exposed endgrain could wreck havoc during sanding and finishing stages and likely during use. They chip off very easily. You are essentially SOL if you drop it from any height. A more practical design is to frame in the kumiko panel to protect it from impacts.
This was a fairly quick build, and maybe the next up is to tackle more intricate and challenging kumiko patterns.
Self-taught hobbyist woodworker, aspired to build fine furniture. As his 15'x8' shop limits housing large power tools, he often takes hand tools to the work to achieve many of his woodworking tasks. Despite being Japanese, he reaches out to western saws and planes first.
Simple, elegant, beautiful coaster design. Your attention to design and construction details is commendable.
Lee S
Thanks, Lee! Although I cannot take much credit for the design, tinkering with the thickness-to-spacing ratio to figure out what looks the best was a fun exercise.