Gel Stains: An easy way to control wood blotching and do other cool stuff

Staining wood is probably the thing woodworkers dread the most, and the reason is that so many common woods that we work with are prone to blotching. Testing your finishing strategy can certainly spotlight potential problems, but unless you test lots of scrap there’s always the chance that you can be in for a nasty surprise once the stain goes on. Gel stains can help tremendously with woods that often blotch, and in this article we’ll take a look at how gel stains work, how they compare to traditional stains, and how to apply them. We’ll also look at a couple of other interesting things that you can do with gel stains that would not be possible with other types of stains.
Stains In General – A Quick Review
Before we dive into gel stains, let’s take a minute to review traditional stains and how they work so that the difference between those stains and gel stains will make more sense. All stains have at least three major components in common. They contain a colorant, a binder, and a solvent.
Colorant
The colorant in a stain is usually a solid, finely ground, synthetic pigment. Stains may also contain a dye, and some contain both. Pigment, being a solid, will sink to the bottom of the can if it’s left undisturbed, so the stain must be well‐stirred before and during use.
When you apply a traditional stain to raw wood the pigment finds its way into all the tiny scratches and pores in the wood and lodges there, giving the wood a new color.
Binder
A binder is what actually keeps the pigment from simply blowing off the wood like dust after the solvent evaporates, so it acts like a glue to hold the pigment in place. Binders can be any of four finishes: oil, varnish, water‐based, or lacquer.
The type of binder used in the stain is critical to how much working time you have to get the stain applied, evened out, and the excess removed. Oil‐based stains give you the longest working time, followed by varnish and water‐based, and finally lacquer, which has an extremely short working time.
Most common stains that you find at the big box stores and hardware stores are oil based. If not they are usually labeled with something that makes sense, so you can usually distinguish between an oil stain and a varnish stain for example. When using an oil stain it’s imperative that you remove all of the excess stain after applying. Oil dries extremely slowly, and never gets very hard. A heavy oil layer on your wood makes it difficult for the finish to achieve a good bond with the wood, and having a soft underpinning for your topcoats can lead to finish failure due to cracking, peeling, or blistering.
Solvent
The solvent in stain is simply whatever the binder is soluble in. In the case of oil and varnish stains it’s mineral spirits. The solvent really plays no role in the staining process itself other than to thin the mixture enough to apply.
Blotching
What is blotching and what causes it? Blotching is uneven stain
penetration caused by variations in wood density, and it leads to dark,
splotchy areas of color. Traditional stains penetrate slightly, and varying
density within the wood allows it to penetrate more in some areas than in
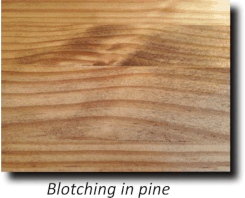
others. Softwoods like pine and fir will blotch significantly, as well as tight
grained hardwoods like poplar, maple, cherry, birch, and alder. Some
woods do not blotch. These include oak, walnut, mahogany, and ash.
Typically blotching is controlled by using either a commercially available pre‐stain control agent or a “wash coat” of thinned out finish. Pre‐stain treatments work by partially blocking the sites where pigment can lodge in an attempt to minimize penetration in the less dense areas of the wood.
This can be hit or miss, and it requires lots of testing, especially if you are making your own wash coat. It doesn’t help that in at least one case the manufacturer gets the directions totally wrong, advising you to apply your stain before the pre‐stain is fully cured.
There is a price to be paid for using a pre‐stain conditioner. The very thing that makes pre‐stain conditioners effective will also result in less stain penetration and, therefore, lighter color.
Sometimes blotching is desirable, as would be the case with birdseye maple or burled wood.
Wood Preparation
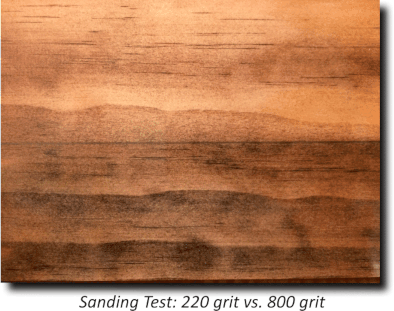
Any pigment stain requires that there be a certain amount of “tooth” be left on the wood so that the pigment has something to grab onto. Oversanding with very fine grit might feel nice, but you’ll find that when you wipe off the excess you might not have much color left. My preference is to sand to no more than 150 – 180 grit if I plan to use a film finish like varnish, shellac, or lacquer. Just a couple of coats will bury the roughness. If you plan to use an oil finish then 220 grit is probably good enough.
Using an orbital sander is fine, but I always finish sanding by hand in the direction of the grain. This helps eliminate any swirl marks you might inadvertently have.
Of course if you don’t plan to use a stain then sand as smooth as you like.
As a side note, dyes will penetrate fine regardless of how smooth you sand.
In the picture at left the top of this pine board was sanded to 800 grit, the bottom to 220. No pre‐stain conditioner was used that would have affected the coloring, and you can see the difference in color after wiping the excess off. You will also notice the blotching that is typical of pine stained with a traditional oil‐based stain.
Scratches, Gouges and Mill Marks
All stains, including gel stains, make any imperfections more noticeable. Sanding across the grain, cuts from marking knives, gouges, mill marks, etc. on the surface are often very difficult to spot until the stain goes on. Wetting the surface with mineral spirits will sometimes make imperfections easier to see, but not always. Shining a light across the surface may also help you spot them more easily.
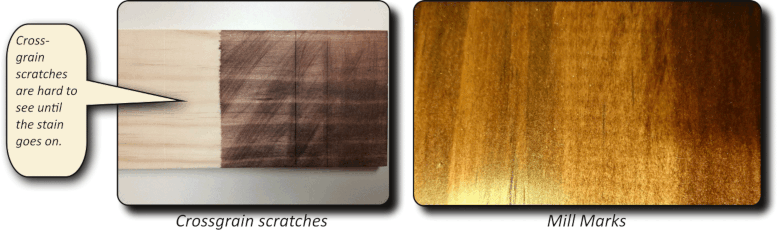
As you can see in the pictures above it pays to take extra care to eliminate as many imperfections as possible before the stain goes on. Once that happens there is very little you can do to resolve the problem short of sanding back to bare wood and starting over.
Gel Stains
Finally we get to the point of the article—gel stains. Gel stains are similar to traditional stains in that they also contain a colorant (almost always pigment), a binder, and a little solvent. But they differ in one important aspect ‐ they are many, many times thicker. Think of chocolate pudding, and you won’t be far off. They are also primarily varnish‐based stains rather than oil, although you may run across some that are water‐based. In this article when we refer to gel stains we are talking about varnish‐based stains. They achieve their thickness through the addition of a thixotropic agent which causes them to gel. While some are thicker than others, there’s really not much difference. In addition to staining wood gel stains can also be used to color metal and fiberglass. They are also excellent for use as a glaze.
So, how do they control blotching? It’s really fairly simple. Gel stains, because of their thickness, sit on top of the wood rather than penetrating into areas of less density so the coloring is fairly uniform, even on woods that are difficult to stain like pine or cherry.
These stains work so well at minimizing blotching that you probably won’t need a pre‐stain conditioner. While gel stains are more expensive than traditional stains, you’ll probably come out ahead if you normally buy a commercial pre‐stain conditioner. And your results will be much more predictable.
Unfortunately they won’t solve the problem of end grain staining darker than the rest of the wood, but that’s more due to lack of sanding than the fault of the stain. Most woodworkers tend to neglect the end grain when sanding because it’s harder to do. Sanding end grain to the same level as everything else will drastically improve the evenness of the color.
A gel stain will also stay where you put it, so it’s excellent for staining vertical surfaces without a lot of mess. You’ll still likely make some mess, but the stain won’t be running down your arm.
Application
Gel stains are best applied with a rag, and I think it works better to apply it like you would a car wax using a circular motion. This lets you hit the wood from all directions, ensuring that no areas are skipped. It’s possible to apply with a brush, but this takes longer and eats into the time you have to wipe off the excess.
If you’ve been reading closely you might remember that varnish stains have a shorter working time than traditional oil‐based stains. Since gel stains are primarily varnish‐based then they too have a shorter working time. Water‐based gel stains perform similarly. This means that once applied you have to work quickly to get the excess off before the varnish begins to set. Think about how quickly a wipe‐on varnish begins to get tacky and you’ll understand why speed is important.
If you don’t work fast you can end up with streaks on your workpiece. So it’s advisable to have someone help if you’re working on something large like a big table top. Aside from that you can easily manage it yourself by working on one section at a time. For example, work on a single table leg and make sure it’s to your liking before moving on to the next leg.
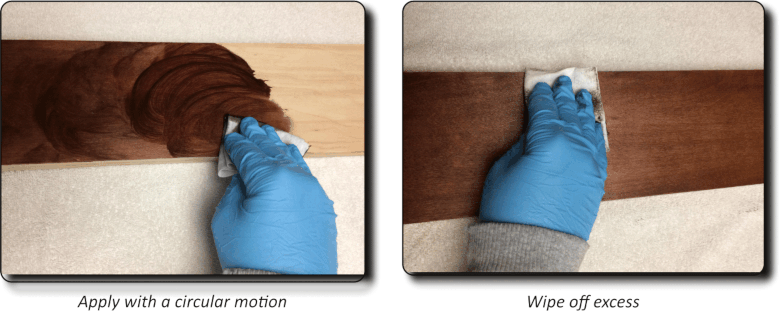
In contrast to an oil‐based stain where excess removal is mandatory, with a gel stain it’s not necessary because the varnish binder will dry fairly hard. It won’t be as hard as its liquid varnish counterpart, but certainly much harder than oil. So you have the option of wiping off the excess or leaving it. Just be aware that if left on too thick the grain will be muddied or even totally obscured.
Building Color
Most of the color will be achieved with the first coat. However, if you need a darker color you can apply a second coat (or more) after the previous coat has sufficiently cured. Gel stains build color slowly, so you have a certain amount of control over how dark it gets. Like any varnish you should let it cure overnight before applying the next coat.
You can apply as many coats as you want, but applying too many coats can obscure the grain of the wood, particularly with darker stain colors. So again, test your finishing strategy (including sanding) using scrap wood all the way through.
Top Coats
Gel stains, even though they are essentially a thin varnish coat, must be topcoated with a film finish for protection. Because the stain sits on top of the wood any scratches will go right through the stain, exposing bare wood underneath. The stain can also wear off under high use, resulting in the same thing. Gel stains may cure to a dull sheen, so in most cases a film topcoat will be desirable anyway.
If you’re using a gel stain as a glaze (more on that later) you should apply it after only one or two coats of finish. The reason for that is to allow enough finish coats to adequately protect the glazing from damage or wear.
The recommended finishes are gel varnish and polyurethane for varnish‐based gel stains, although you may also use shellac and lacquer.
If you plan to use lacquer there are a couple of things to keep in mind. The stain must be fully cured and very thin, so you need to wipe off all the excess as you apply it. Thick coats of gel stain can cause lacquer to wrinkle. If this happens during your testing you can try applying a coat of dewaxed shellac first, before applying lacquer. This will give you a barrier between the varnish and the lacquer.
You can also try misting on a few very light coats of lacquer until you begin to get a film build, then go ahead with a normal coat.
I have successfully applied brushing lacquer over gel stain ( wiped off excess) after allowing several days to cure.
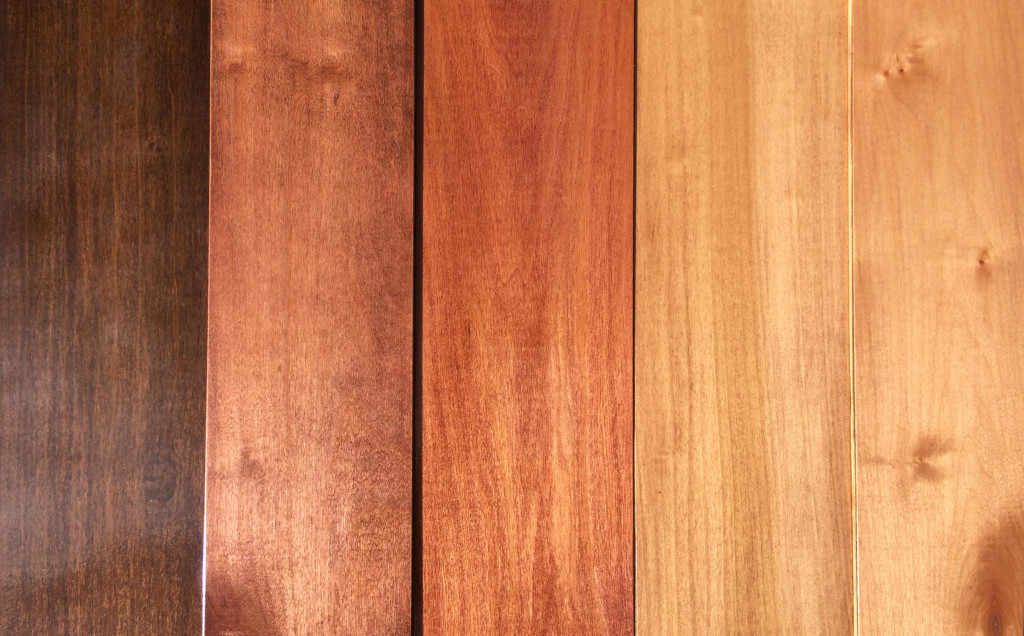
Examples
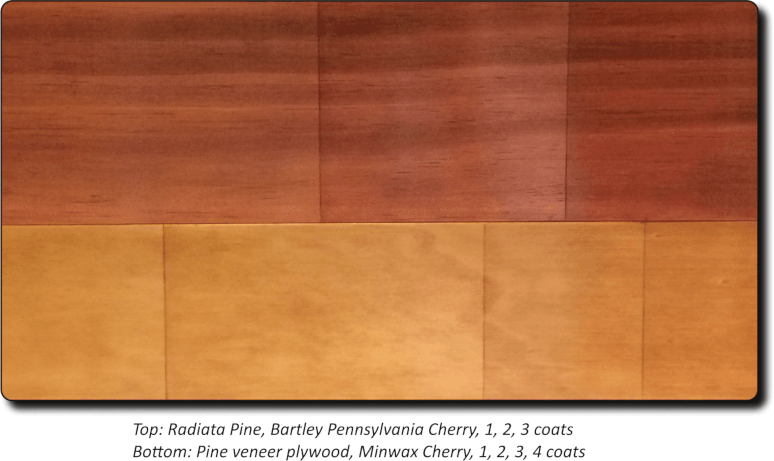
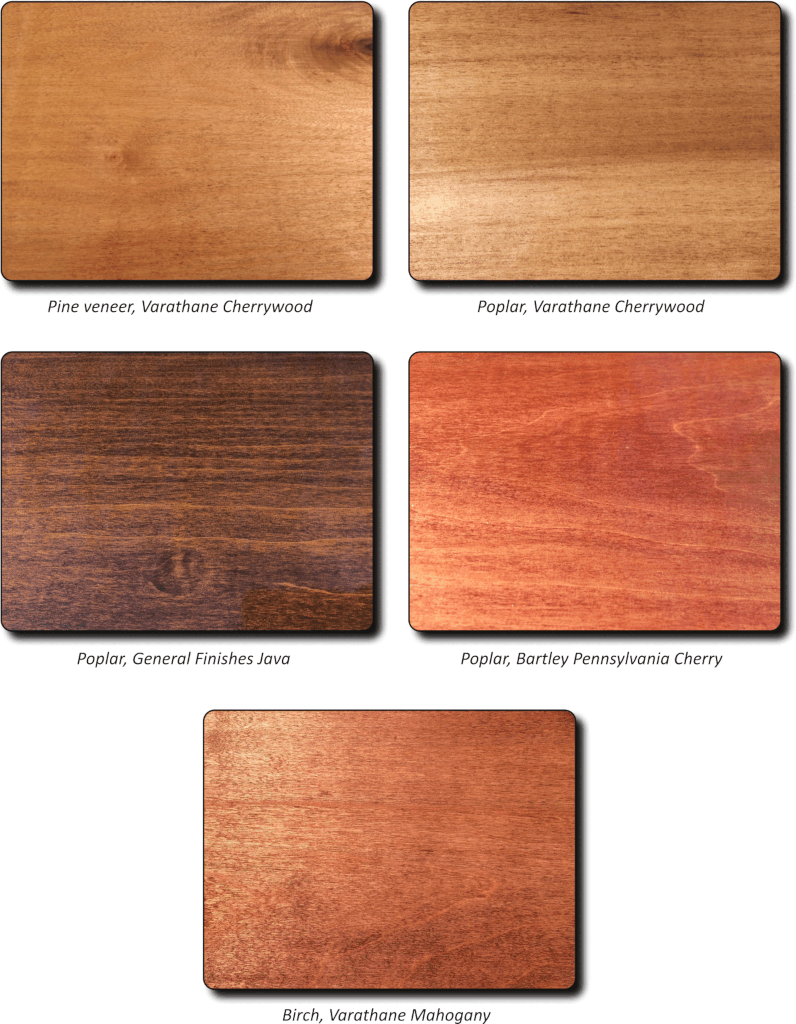
All of these samples were stained with gel stain and topcoated with wiped on polyurethane, the exception being the birch sample. It was finished with lacquer. No pre‐stain conditioner was used. The samples were all sanded to 150 grit, and gel stain was applied directly to the raw wood.
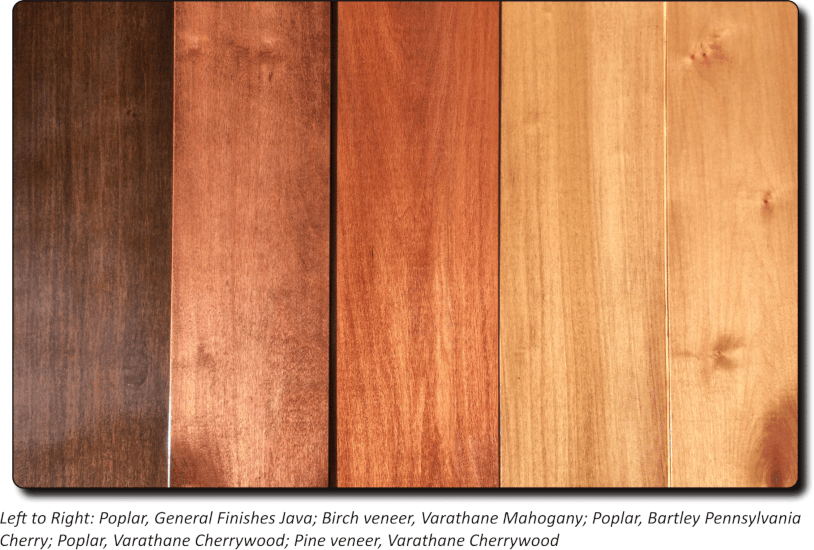
As you can see there is very little, if any, blotching on any of these samples.
Using Gel Stain As A Glaze
Glazing is a coloring technique whereby color is added between two layers of topcoat. This is not the same as toning, where the color is actually in the topcoat itself. You can use this technique in a variety of circumstances, from adding decorative contrast between areas to correcting a color after you have already begun the finishing process.
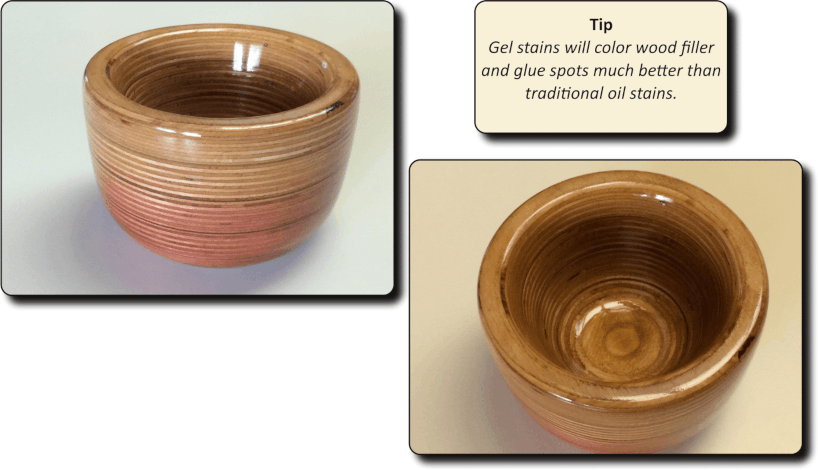
Recently I decided to turn a bowl from laminated blocks of plywood, thinking that it would be a good test for using gel stain as a glaze in a difficult coloring situation. If you’ve ever used plywood for anything you know that the cut edge is chock full of voids, chips, and differing types of wood, with grain running in every direction. Getting any kind of consistent coloring with a penetrating stain applied directly to the wood would be nearly impossible.
Turning the bowl was challenging because the wood had a tendency to chip rather than cut smoothly. As expected, the surface was very rough and pitted. This required lots of wood putty to fill. Once dry it was sanded and three coats of transparent grain filler were applied, again sanding between coats. At that point the bowl was fairly smooth, but I doubted that it would take an even coat of gel stain. So I wiped on five coats of polyurethane, let it cure, and sanded it smooth.
Now, with a perfectly sealed bowl, I was ready to stain. Actually, because the bowl had been topcoated already, what I was really doing was applying a glaze.
Starting with a light stain, I applied it to the ensure bowl while it was turning slowly on the lathe. That looked reasonably good, but what I really wanted was a reddish color on the bottom that blended with the color on top. So after the first lighter coats cured I started at the bottom and layered on the reddish stain. The bowl was then finished with high gloss polyurethane, wiped on. The stain never actually touched the wood, which is a characteristic of glazing.
Adding Age and Depth
Things like rosettes, beading, turnings, and carvings can benefit from the application of darker color to the recesses to add some drama to the piece and to imitate the effects of aging. In this example I turned a short spindle from a poplar blank and stained it using a mahogany gel stain.
After it had cured, and while it was still on the lathe, I applied a darker gel stain to the recesses with a Q‐Tip and wiped off the stain from the higher areas, leaving it in the deeper crevices.
The spindle was finished with gel varnish, which is simply gel stain without the pigment. Gel varnish works great and is easy to apply, but it only comes in a satin sheen. You should also note that it’s not quite as durable as a liquid varnish so it’s not well suited for something that will get a lot of wear, like a table top.

- Sanding on a lathe is almost always cross‐grain, so sanding to 220 grit or higher will minimize visible scratch marks. Be sure to test your sanding/finishing strategy!
- If you’re lucky enough to have a lathe with reversible direction then sand in both directions,and apply stain the same way. This ensures that the workpiece doesn’t look lighter or darker depending upon the direction from which it’s viewed.
That’s it. Happy Finishing!